Search This Blog

Monday, March 4, 2013

Do Leprechauns taste like mint?

It's already March! What the...? Wasn't it just Christmas?

I guess that means it's time for another made-up holiday! I love these fake holidays, and St. Patrick's Day in particular is a favorite of mine.  First off, my name is Kelly (Irish). Second, I look really great in variations of green. All the obvious makings of a great holiday! 

The one St. Patty's downside? Leprechauns.  Those little buggers are creeptastic. It's the small hands and pointy ears. There is even a 1993 horror movie about them, due to their high-skeeze factor. It stars Jennifer Aniston, so you know it's a scary film.

Thankfully, I know of one sure way to overcome any fears of fake holidays and miniature men with small hands.  Sugar!

While perusing the local Target recently, I found these delicious looking dark chocolate mint m&m's.  Dark. Chocolate. Mint! Oh my, these little guys called to me.  I didn't really even think of what to put them in - just that I needed them.
Yesterday, when I was looking through my pantry right at these minty little darlings, I immediately thought of a St. Patty's cookie.

I began with my very favorite sugar cookie recipe stirred all up in one bowl:

Next, I threw some crushed chocolate sandwich cookies into that bowl of delicious:
Pre-packaged for lazy people

Followed closely by a bag of chocolate chips dumped right in:
No measuring, just a whole bag!
Finally, the minty-green star of our show makes it's best impression:

Bake those all up at 375-degrees for 10 minutes and....ta dahhhhh!!!
All of the St. Patrick's Day celebrating!!
Now go forth and celebrate all things minty green, St. Patrick, and even those sneaky little leprechauns!

Ingredients:
1 cup butter, softened
1/2 cup white sugar
1/2 cup confectioners' sugar
1 egg
2 1/4 cups all-purpose flour
1/2 teaspoon baking soda
1/2 teaspoon salt
1 1/2 teaspoons vanilla extract
1/2 teaspoon cream of tartar
2 cups crushed chocolate sandwich cookies (like Oreos)
2 cups chocolate chips
1 bag dark chocolate mint m&m's

Directions:
1. Preheat oven to 375 degrees F (190 degrees C). Lightly grease baking sheets.
2. Cream butter, white sugar and confectioners' sugar together until light and fluffy.
3. Beat in the egg and the vanilla.
4. Sift the flour, baking soda, salt and cream of tartar together.
5. Add the flour mixture to the wet mixture and stir.
6. Add 2 cups of crushed chocolate sandwich cookies (I found mine pre-crushed in the ice cream toppings section of Target, but crushing your own would work brilliantly!) and fold in.
7. Add 2 cups (one 16oz. package) chocolate chips to the dough and stir them in.
8. Shape dough into 1-2" balls and place on the prepared baking sheets. 
9. Take 2-3 mint m&m's and press them into the dough balls.
10. Bake at 375 degrees F for 10 to 12 minutes or until lightly browned.

Friday, November 16, 2012

Mom's Cinnamon Rolls

These rolls are ready for baking!
So, I posted this photo on FB and cannot believe the response. I heard from friends that have dropped out of FB and disappeared! What is it about cinnamon rolls that does that to people? The spicy sweet smell as they bake in the oven? The yeasty earthy smell as they rise before baking? Or just that yummy, warm, sweet first bite???

I've been making these rolls with my mother since I was old enough to stand on the kitchen stool and reach the counter. And my daughters have been making them for just about as long. Now my girls have found all kinds of additions to dress up these simple cinnamon rolls and they are still a bite of heaven! I've stuck to the original, simple recipe that my mother gave me. I'm kinda' simple myself!!

I will do my best to put the recipe down in words. You know how recipes are... dependent on the weather, humidity, mood of the baker, etc... Mom always used the basic recipe (kinda') but the important parts are passed on orally. That part you learn from your mom. But I will try to pass on in written form the wisdom of Yoda the bread maker!

This recipe takes time because it is a bread and needs to rise. However, it is not labor intensive or difficult! Start it in the morning so you have plenty of time. It also is best if you just ignore it most of the time and let it do the work. I used to worry over the dough and found that just gave me indigestion and did not help the dough!  I hope you will try it out!

Ingredients for the dough:

2 packages yeast (I use the regular due to altitude but closer to sea level you might like the rapid rise)
1/2 cup lukewarm water
2 teaspoons salt
1/2 cup sugar
1 1/2 cup milk
2 eggs
1/2 cup shortening
6-8 cups flour (I like bread flour but all purpose works also)

Ingredients for the topping:
1/2 to 3/4 cups brown sugar
2-4 tablespoons cinnamon
2-4 tablespoons melted butter

STEP 1

Heat the oven to 375 degrees F.

Mix together (I usually do this in a large 4 Cup measuring cup):
lukewarm water (just so it is not cool or hot when you test with finger)
salt
sugar
milk (I warm this to lukewarm temp in the micro)

Sprinkle the yeast into the mixture, stirring gently until dissolved. "Remember, yeast is a living thing and does not like to be handled roughly!", I can hear my mother saying!

STEP 2

I do this step in the mixer with the bread dough hook:

Crack and beat 2 eggs in a separate bowl before adding to the mixer bowl (that will save you from fishing out eggshells or bad eggs) with 1/2 cup shortening. This will not mix entirely but will have clumps of shortening in the eggs. Don't worry, it will mix during the next steps.

STEP 3

Mix the yeast mixture into the egg/shortening. Start adding flour by the cupfuls. I usually need/knead (cute, huh?) about 6 1/2 to 7 1/2 cups with the final flour being mixed on the floured board by hand. This is the babies bottom point of the recipe. The dough should not be dry but should be elastic and slightly damp like the previously mentioned baby. It should not stick to your finger when you touch it or that baby needs more powder!
Round your little baby and place in a large bowl that has been sprayed with a baking spray.

STEP 4

After the second rising (yes, you let it rise for an hour or more in a warm place to about double size, then knead it on the flour board, round it up, and let it rise again-this is the part that takes time but you can be off reading a magazine, having a glass of wine, talking to your buddies, or facebooking and still pretend that you are working!) you will knead the dough one more time and split in half. Roll the dough out on the flour board to about a 20 x 10 inch rectangle or about 1/4 inch thick.

Spread the melted butter on the dough rectangle, then cinnamon, then brown sugar. Just a light layer, not too thick. If it is too thick it will melt out the bottom of the roll as it bakes and make a terrible mess. I know, I've done it way to many times. "You know, more is not necessarily best!"

Roll the rectangle starting from the long side. Fold over the ends as you roll (my mom would say pinch but I don't think that really works, sorry Mom!)

Slice the rolls about 3/4-1 inch thick and place them in greased/floured pans (you know spray with baking spray! Ah, the modern conveniences!). Make sure there is some room between them but not a ton. You want the dough to expand out not up too much. Place them in a warm place and let them rise another 15-30 minutes until light. Go do your nails while you are working so hard (don't you just love yeast breads?)

STEP 5

Bake for 20-30 minutes at 375 degrees.  Rolls should be fairly dark brown on the top and have a little crust to them but spring back when you touch the mid rings (between the edge and the middle dome).

STEP 6 (Optional)

I usually de-pan the rolls now and place them in plastic bags to store. I might frost them first or just keep some on had to frost as needed.

Make a loose, not quite runny buttercream frosting and use rum extract instead of vanilla for the flavoring. Drizzle this over the cinnamon rolls. You can leave them bare (Kelly's and Megan's favorite) or smear them with tons of frosting (Mike's and Chris's way). You can store these in the freezer until you need them and put them in the oven to warm when you are ready to fool your guests into thinking you just baked them!! My mom would add a few dabs of butter on top of the rolls before heating them and they were heavenly (however, full of calories, but who is counting now anyway??).

Baked, bare, and bagged! Yummy!
These are a holiday favorite in my family and always bring back memories of my childhood. I enjoy sharing them with family, friends, and neighbors who are always so impressed like I worked all day on them! Shhh, don't tell!

P.S. Let me know how they work for you and if you have any questions. I will try to take pictures next time to help you along the way. I did not plan to post this so pictures were not even considered at the time of baking. Sorry!

Thursday, October 11, 2012

Peanut Butter Ice Cream Sandwiches


It is my oldest son Andrew’s birthday… What should I make for desert? He claims he doesn’t want pie or cake. He really liked the peanut butter cookies I made not long ago and he loves ice cream… Hey, guess what? My youngest son Richie, suggested Peanut Butter Ice Cream Sandwiches! What a great idea!!!!!!!! Andrew will love it!

Ingredients:
1/2 cup butter
1 cup peanut butter
3/4 cup granulated sugar
1 cup firmly packed brown sugar
1 egg
1 tablespoon lukewarm water
1 teaspoon vanilla extract
2 teaspoons baking soda
1 1/4 cup all-purpose flour
 8oz dark chocolate chips
1/2 cup granulated sugar
Peanut butter cup ice cream, softened (Take the ice cream out of the freezer after the cookies have cooled otherwise you will have ice cream soup… lol)

Directions:
The butter, peanut butter, and egg should be at room temperature.
Preheat your oven to 350 degrees. Cream the butter, peanut butter, granulated sugar, and brown sugar until light and fluffy. Add the egg, water, and vanilla extract. Beat until incorporated.  Add the baking soda, the flour, and the chocolate chips. Mix until just combined. Roll 1- 1/2 inch balls of dough in the granulated sugar and place about 2 inches apart on a cookie sheet. Bake for 10 to 12 minutes. Do not over bake as the cookies should still appear slightly uncooked. Cool completely. To assemble sandwiches spoon softened ice cream on to the bottom of a cookie, top it with a cookie that is the same size. Place sandwiches on a cookie sheet and put in the freezer until ice cream is completely frozen. Store sandwiches in an air tight container in the freezer.


Friday, August 24, 2012

Peanut Butter Wonders


Hi, it’s me again… I haven’t been posting lately, as I have been teaching in two different programs this summer! I now have time to post again….

Peanut Butter Wonders
Ingredients:
1 cup peanut butter
1/2 cup butter
1 cup brown sugar (Using brown sugar instead of white sugar makes these cookies softer)
2 eggs
2 teaspoons aluminum free baking powder
3 cups whole wheat flour (Using whole wheat flour, bumps up the protein and makes you feel less guilty about eating an entire batch of these tasty treats!)
Blackberry jam (or whatever kind of jam you happen to love with peanut butter)

Directions:
Preheat your oven to 350 degrees. Beat the peanut butter, butter, and brown sugar until light and fluffy, add the eggs and continue beating until well incorporated. Add the baking powder and mix well, (I find that mixing leveling agents into your wet ingredients helps to ensure that all the dough gets an equal amount, and therefore whatever you are baking rises more uniformly.) add the flour a cup at a time, beating well after each addition. You want the dough to be stiff so that it holds its shape when baked. Using your hands roll the dough into 1” balls. At this point you can make either one or both types of cookies shown in the picture, hence the name Peanut Butter Wonders. For the jam cookies: use your thumb to make an indent in each cookie. Make sure that you press any cracks together, so that you have a solid wall to hold in all the yummy jam. Then fill each indent with jam. For the sugar type, peanut butter cookies: simply flatten the cookies by pressing with the bottom of a glass. Then sprinkle with brown sugar. Bake for 10 minutes, or until golden brown around the edges, but still soft.

These cookies are delicious! Yum!!! Oh wait, I just noticed that I have some strawberries that need to be used. Hum… maybe a strawberry cake of some kind… more on this later!

Monday, July 30, 2012

Kicked-up Peanut Butter Pretzel Brownies

Something about the competition of the 2012 Olympic Games is making me... well... competitive!!

As a child, teenager, and even a college student I engaged in an awful lot of this:
{ECHS Baby!}
I had an awesome experience with team sports growing up, and although I may be a tad less competitive in adulthood, I would say that it is more latent than non-existent.

Although I may be a gold medal winner in semi-homemade baking for this little corner of California - it is time to kick it up the training a notch!

My first trial toward a new championship in the baking world came yesterday in the form of a barbecue thrown for a friend of ours, who will soon be moving to Chile to serve a two-year mission for his church.  We knew we had to give this kid as much support, love, and refined sugar as possible before his service begins.  How better to do that than with a pan-full of peanut butter, chocolate, and pretzels that also paid homage to my water polo past and the current Olympic Games!

The base was a scratch brownie derived from Damaris' recipe over at Kitchen Corners.  I have made this super-simple brownie on a few occasions and it never fails!
So delicious.

These brownies are fantastic all by themselves, but I knew that this competition barbecue deserved a little extra special flair 
(the kid is MOVING to CHILE!) 
and that came in the form of a very simple peanut butter frosting.
{Peanut butter + Brownie = Heaven!}
As any great athlete knows, one should always finish strong. So to achieve the correct amount of tastiness, why not top the whole thing off with some chocolate-covered pretzels?
I could not think of one single reason not to.
We are in this to win this, y'all!
{So much goodness}
Kicked-Up Peanut Butter Pretzel Brownies

For the Brownies:
Recipe by Damaris Palmer at 
Kitchen Corners found HERE
1 stick butter (1/2 cup)
1 cup white granulated sugar
1 large egg
3/4 cup all purpose flour
5 Tbsp. unsweetened cocoa powder

Preheat oven to 375*
Place the butter in a small mixing bowl and microwave until the butter is melted.
With a wooden spoon mix in the rest of the ingredients until smooth.
Pour into a small baking pan.
Bake for 15 minutes.

For the Frosting:
1/2 cup butter, softened to room temp
1 cup creamy peanut butter
Milk, as needed
2 cups confectioners' sugar

Place the butter and peanut butter into a medium bowl, and beat with an electric mixer. Gradually mix in the sugar, and when it starts to get thick, incorporate milk one tablespoon at a time (as needed) until all of the sugar is mixed in and the frosting is thick and spreadable.
Beat for at least 3 minutes for it to get good and fluffy.

For the chocolate pretzels:
2 cups pretzels of choice 
(I used sticks, but twists and rods are likely fine as well)
One bag of milk chocolate chips (12 oz.)

Place chips into a microwave safe bowl.
Microwave in 30 second intervals stirring in between to reach the desired drizzling consistency
Line a baking sheet with parchment or wax paper
Lay pretzels over the paper and drizzle chocolate over pretzels
Cool and crush pretzels, then sprinkle over the peanut butter frosted brownies in the desired amount
And just like that, I see a medal winner in my future!

Tuesday, July 24, 2012

The Olympics are Coming....

I don't know how anyone can not be excited about the upcoming Olympics. I don't care so much about the rivalry between the countries but more about seeing such awesome physical feats. I am amazed every 4 years when I see what the youth of our planet are dedicated to, and spending hours of practice to perfect! And I know for a fact that the Olympics are the place to be to learn more about other cultures and find the similarities among peoples.

Also, I feel challenged in the only area that I can perform...to make something exciting to reflect the Olympic spirit!! (Armchair athlete, right?)

After spending some serious time searching my favorite sites I have a few to share with you. Each of these look like something you could replicate easily and some even have step by step directions (LOVE THOSE!) or purchased/printed items!

On The Sweet Adventures of Sugarbelle is a tutorial for making your gold medal cookies really shine!
Seeeeee...... So cute!

Check out the directions at Sugarbelle's site!

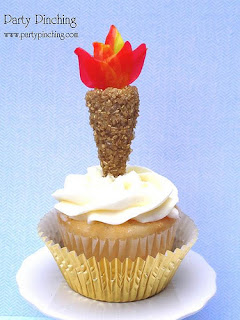
And, of course, Cupcakes Take the Cake, has already done her research and found some great Olympic ideas and kits that are available through Amazon for decorating! I love the torches and the rings on the cupcakes! She has many ideas to review so do go to her site. You will find something you like I'm sure!

From Party Pinching


Just when I'm deep in my research I realize there is a huge snag, as always! Check out the situation in England where the Olympics are being held! I do truly understand and support copyright but I'm sad to hear that the Olympic symbols are not to be used on any cakes, cupcakes, cakepops, or anything else. Boo! 

So, what can you do? Well, each of the sports is not copyrighted! The torch, the medals, the colors, the equipment, and the action are not copyrighted. Go for it!!

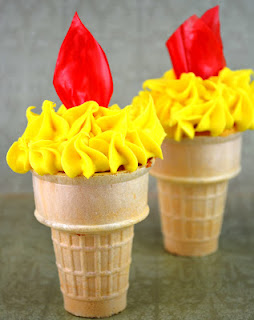
Sweetology has an adorable Olympic Torch cone cake! Kids always love cone cakes. What is better than cupcakes and ice cream cones??


On Good To Know Recipes we have a much more elaborate torch that took time and lots of skill. It is adorable but don't know if my patience is long enough to produce enough of these. 


This same recipe  and picture are on Victorious Cupcake. The directions are included for making this adorable cupcake. Now that I have more information I might be trying these. I just have to have those directions to be brave enough to pull something like this out of the hat! 

And speaking of copyright...what is up here? 

Now for those sports that we so enjoy in the summer Olympics. Found a great site with decorations already made for you! My idea of a good, easy and cute solution!!

On Cake Craft Shop you will find the most wonderful ideas and items to purchase. Check some of these out! I love the discs with the different sports!

Are you interested in FREE??? These printable decorations are free from Hoosier Homemade!!

Skip on over to Flicker to take a look at Ally Cake Designs' adorable set of gymnasts on top of her cupcakes. With a little color change they could easily represent the Olympics, right? Tumble on over to take a look since I cannot share the picture! "Copyright" seems to be the lesson of the day, right??

Three more days to get those cakes and cupcakes ready for the opening ceremony!! Wow! I'd better get serious in the kitchen!!


Tuesday, July 10, 2012

Baking a Rainbow!

One thing that we all are now aware of is my deep love of semi-homemade and quick treats. 
I could go into the myriad benefits of these baked goods, but the one I want to focus on today is how fun and easy they are to make with KIDS!

I am lucky enough to spend time with a local youth group. We meet every Tuesday evening for some sort of activity or another. 
This past Tuesday, we took on a baking challenge and attacked the world of crazy colored cupcakes!

After making up a batch of white cake mix, we separated the batter into six equal portions and used about 1/2 tsp. Wilton gels in each bowl to get a good, vibrant variation of colors:

The girls were more than willing to portion, mix, and dye each of the bowls...FUN!

Next, pour two to three colors into each prepared cupcake liner. Do not stack colors, but think more of a pie-chart formation.  Once the colors are in the liners, use a toothpick to swirl, making sure each color is still showing from the top:

Be careful not to OVER stir your colors, because that makes brown.

Be sure to always taste as you go...
what if it is poisonous??
What if it is yucky???
What if it turns your mouth kelly green??
Always eat raw cake batter
...uh, I mean don't.
{Our very own sweet-tooth fairy}

Top with your preferred frosting of choice.
Finish with the obligatory sprinkles!

**Note**
Allowing kids and teens to use a piping bag for frosting application will make you awesome!

I can tell you that these were so yummy, in addition to being super cute!
I did NOT get a picture of the final product cut open (we actually ended up delivering all of these to various friends and neighbors) but click through below to the recipe we used to see an awesome picture of the inside of these colorful creations!

Find the whole recipe
(and some gorgeous pictures)
over at Newtrition

Now go out and have some COLORFUL baking fun!